Diesel Engine - Crackling/Ticking Noise At Idle
Engine makes intermittent knocking noise, ticking/crackling
Topic number LI03.20-P-048278
Version 3
Design group 03.20 Crankshaft
Date 03-26-2013
Validity Model series 211, 219 with OM 642
Model series 164, 251 with OM 642
Model series 203, 204, 209, 221 461 463 with OM 642
Reason for change New part number for upper main bearing shell, bearing
point 1
Complaint:
The engine makes ticking/crackling noises at idle speed and at speeds up to approx. 1500 rpm.
Notes:
^ The noise occurs after a mileage of approx. 20,000 km or after an oil change.
^ Noise can be clearly heard in area of 1st crankshaft main bearing.
^ Noise can no longer be heard when the poly-V belt is removed.
^ It is essential to compare the noise of the complaint vehicle!
^ Noise is irregular. Pulse-like crackling noise occurs at irregular intervals.
^ 20 pulses (ticking) which represent justifiable complaints.
Cause:
Run-in effect of 1st crankshaft main bearing.
Scope of test:
Remove/install poly-V belt.
- Run engine with poly-V-belt. Compare to attached reference noise file.
- Run engine without poly-V-belt and listen if the noise is still there.
Note:
If the ticking still occurs after the poly-V belt is removed, there is no defect at the main bearing shells of the 1st crankshaft main bearing.
Proceed further to determine the cause.
If the ticking is gone after the poly-V belt is removed, there is a defect at the main bearing shells of the 1st crankshaft main bearing.
Remove/install bearing shells of 1st crankshaft main bearing must be replaced.
Remedy:
Replacement of bearing shells of 1st crankshaft main bearing
Note:
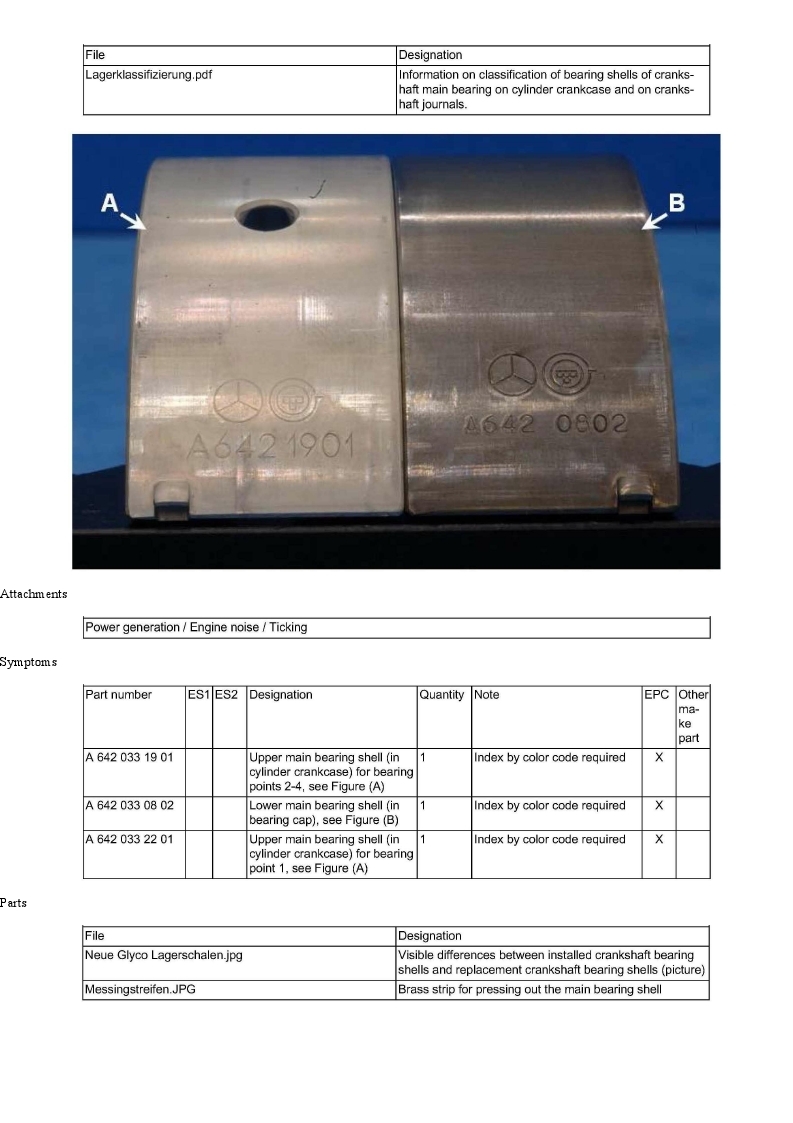
Make sure that only the new/lead-free bearing shells are used. Observe the part number while the component is still packaged - there is no object
number on the component! The old bearing shells look different from the new ones. To compare them, refer to the illustration in the attachment.
Procedure for replacement of bearing shells of 1st crankshaft main bearing. model series 211:
1. Remove belt pulley with vibration damper.
2. Determine bearing classification.
Page 2
Note:
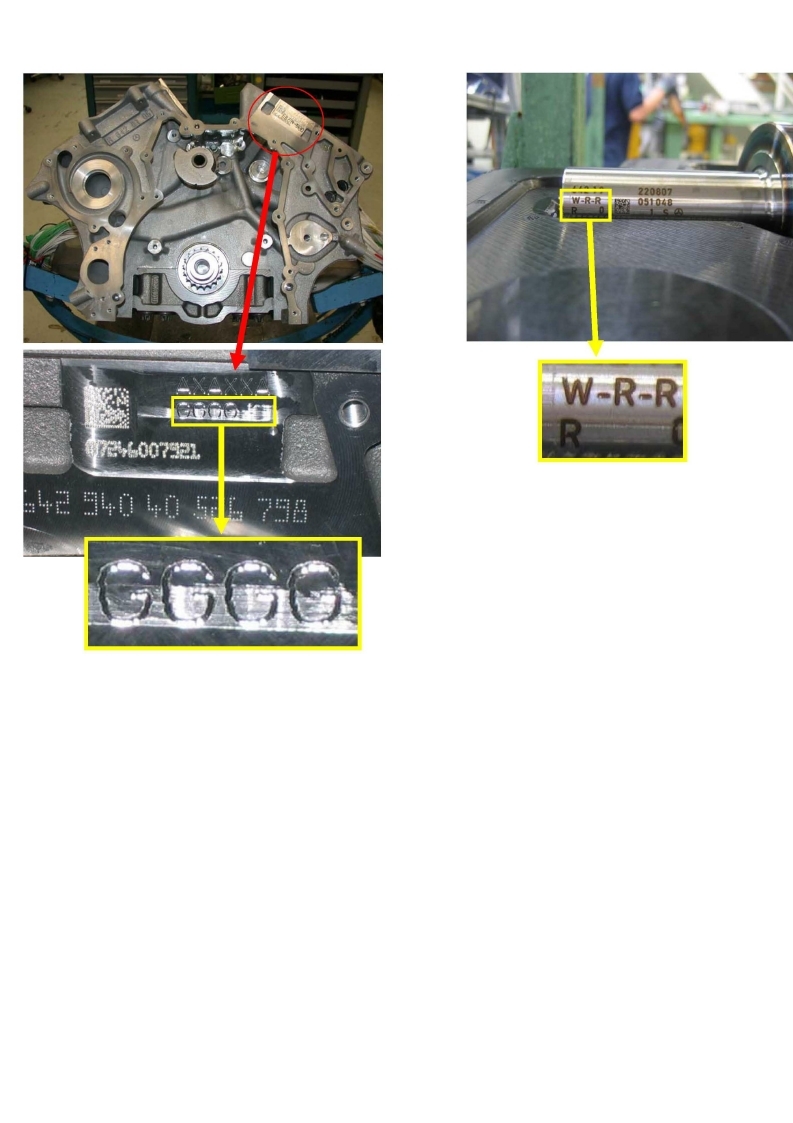
The main bearing shells exist in various type and tolerance classifications which are subdivided into different color codes. This means that
the upper main bearing shell of a bearing may have a different color code from the lower main bearing shell. It is important to select the
correct main bearing shell for the specific position - according to the defined specifications. For the positioning of the bearings: The bearing
class information runs from left (1st main bearing) to right (2nd - 4th main bearings). Meaning of color codes (color index): G = yellow (54),
R = red (56), B = blue (52), W = white (57), V = violet (58).
The tolerance class is determined based on the following specifications (see attachment "Bearing classification"):
- for the upper bearing shell on the cylinder crankcase,
- for the lower bearing shell on the front crankshaft end.
3. Disconnect battery ground line.
4. Remove underfloor soundproofing.
5. Remove automatic transmission.
6. Remove crankshaft drive plate.
7. Remove oil pan.
8. Remove oil pump.
9. Detach A/C compressor.
Note:
Detach A/C compressor from cylinder crankcase and tie up to one side with lines connected.
10. Remove crankshaft bearing cap of 1st crankshaft main bearing.
Note:
Do not remove the remaining main bearing caps.
Chain tensioner does not have to be removed.
11. Remove/install new bearing shells of 1st crankshaft main bearing.
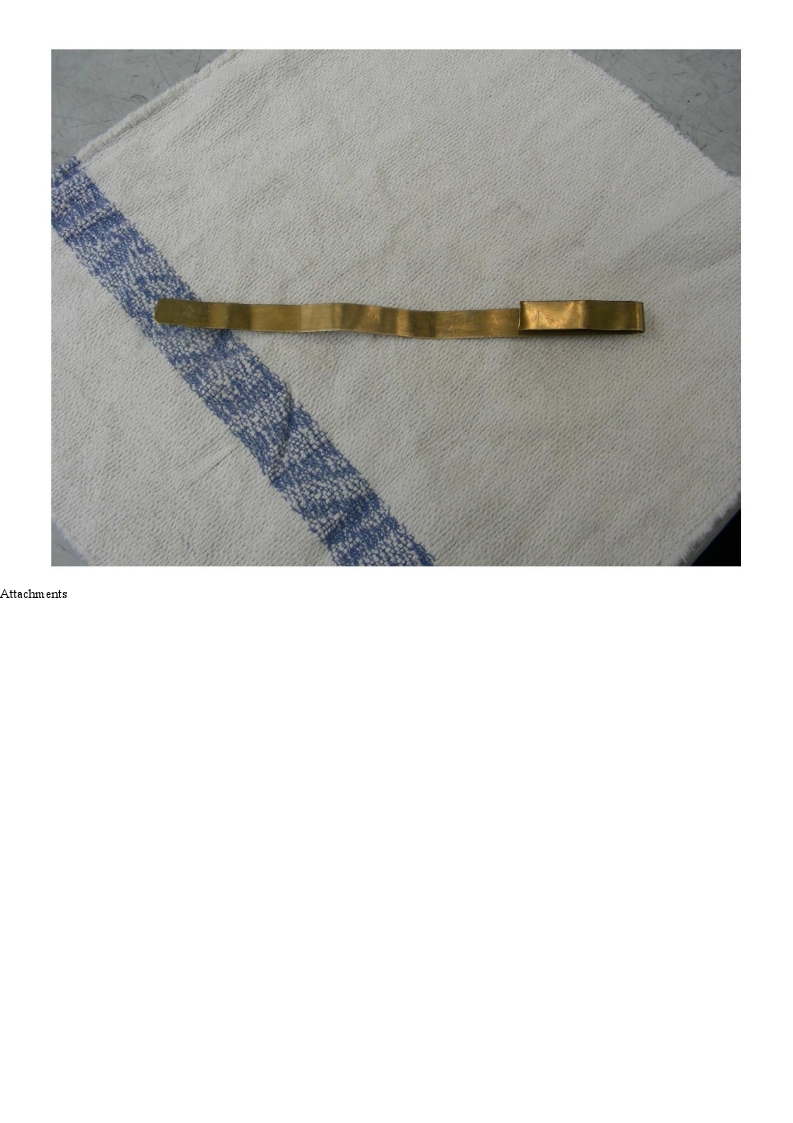
Note:
Using a soft tool (plastic wedge or brass strip approx. 4 mm thick), press out the main bearing shell from the side without the guide lug and
pull out from the other side using the holes in the main bearing shell. Be careful not do damage or scratch the bearing surface of the
crankshaft (see picture of brass strip in attachment).
Coat new bearing shells with engine oil and install. Make sure that the main bearing shell/guide lug is correctly engaged.
12. Install crankshaft bearing cap of 1st crankshaft main bearing.
13. Replace crankshaft radial sealing ring.
14. Reassemble the removed components in the reverse order.
15. Check oil level in automatic transmission.
16. Carry out a quick test after repair.
17. Clean engine.
For the repair scope "Replacement of main bearing shells of 1st crankshaft main bearing" refer to the operation numbers for the relevant model
series. Refer to the respective valid repair instructions for the tightening torques.
Attachments
Symptoms
Parts
Attachments